

EVERY PICTURE TELLS A STORY

The summer has passed, my writing bones are rested and it’s time to get back to stories of flying and courage in the Second World War. It’s time to lap the laptop, open up my folder of random images collected this summer, and tell a story of stories. The Second World War, in its size, its duration, its breadth, its violence, and its madness is, for most of us, a most difficult subject to fully grasp. For me, the trauma we call the Second World War is not about the politics of alliance, the cult of dictators, the strategies of generals or the division of heroes and villains, winners and losers. It is about human beings caught in a Tilt-a-whirl of extreme violence and sorrow. It is about small stories. Ordinary people. Emotions.
I remember years ago seeing a hologram on a sheet of glass and then seeing that sheet shattered on the ground in a demonstration. You could pick up any shard of that broken glass and hold it up to your eye. No matter what shape or size of the piece that you held in your hand, in it you could see the entire hologram unbroken. Like those broken slivers of holographic glass, these photos are like windows that open on the maelstrom, and though each is entirely different, through them, we can glimpse the war. That’s what these and the millions upon millions of other photographs of the war are to me—portals through which we peer, like voyeurs, to see what our minds can’t grasp.
“Every picture tells a story” said Rod Stewart and here’s the proof. Each of the following photographs, when looked at closely and researched only just a little, can release its secrets—secrets that are longing to be set free. They have been randomly collected during research periods and are randomly presented here, each drawing us in, each with a tiny fragment of the story to tell. In several cases, wanting to learn more about the event being portrayed, I searched for another photo to help tell the tale.
Let’s, as I always say, let the photos do the talking.
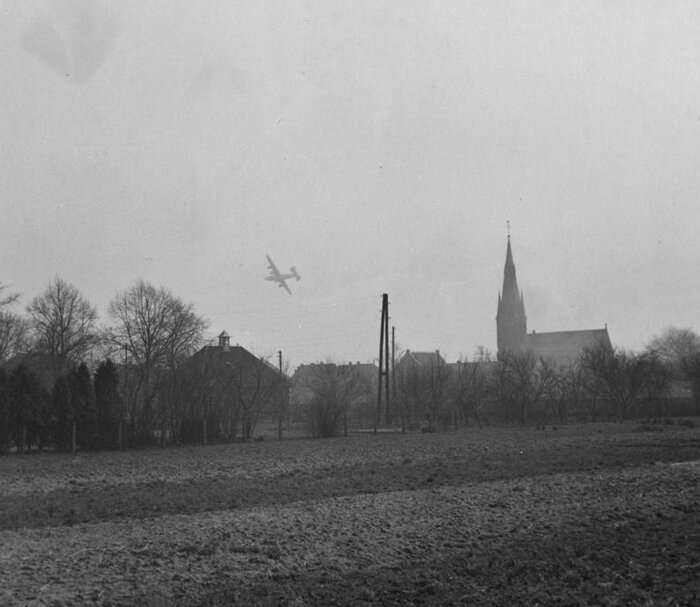
![A story to be told. Some photographs don’t have to be overly dramatic to deliver an emotional blow. This photo of an Eighth Air Force B-24H Liberator in the haze and about to make a forced landing at RAF Eye in Suffolk hits me hard. It speaks to the fact that the six remaining men aboard are now all alone, encased in a wounded metal machine and about to attempt an uncertain landing with heavy damage. The aircraft had been mauled by enemy fighters over France with severe damage to its tail turret, fuselage and hydraulic system. The tail gunner had been killed instantly, and the two waist gunners had bailed out. The training for the pilots is now kicking in, the only means by which they can save themselves. There is something about the haze, the church steeple and the distance that speaks to their plight. It looks misty and silent and it seems their trial is near its end—but this is the most dangerous time, and those young American men we can’t see inside that shape are scrambling to save their lives. The Ford-built (Willow Run factory) Liberator (42-95025) of the 579th Bomb Squadron of the 392nd Bomb Group, piloted by Lieutenant Harry A. White, crashed at Eye on 15 June 1944. The six men survived. The following 392 BG intelligence report demonstrates the severity of the damage—something you cannot see in this photo: “On the mission of 15 June 1944 to a bridge at La Frillière, near Tours, A/C #025, piloted by 1st Lt Harry A. White, Jr, was attacked by E/A. The exact time and place of the attack could not be ascertained from Lt White’s crew, who had their hands full dealing with battle damage and flying the plane home. From interrogation of the crew in the hospital the next day and from crew reports of A/C nearby in the formation, the attack is estimated to have begun at about 0658 hours in the vicinity of (4749N-0119E) [59 km/37 mls northeast of their target – editor]. Five or six Fw 190s, from a group of 20 or more, attacked our formation. Three of these attacked Lt White’s plane—one from either side and behind, one from the rear and below. The plane was badly hit by 20-mm shells and machine gun fire. The tail gunner, S/Sgt J. Wehunt, was killed, and the waist gunners, S/Sgts Braccioforte and Weitkemper, bailed out. The tail structure and turret were ruined. Shells and bullets entered the fuselage near the waist windows on both sides. Oxygen bottles exploded, and a 20-mm shell burst on the flight deck, wounding the engineer, T/Sgt Glenn M. Barnes, in the face and neck. Smoke filled the plane. The hydraulic system was shot out, rendering the bomb-bay doors inoperative, and escaping fluid poured through the plane, freezing to the floor and sides. Bombs were salvoed through the bomb-bay doors. No. 3 engine ran away. Rudders and trim tabs were out, and the plane was flown home (with the 93rd Bomb Group) by main force and the skill of the remaining crew. The intercom was out. S/Sgts Braccioforte and Weitkemper, at the waist guns, presumably bailed out when fire from attacking planes came into their positions. It should be emphasized that in the confusion of the attack their own crew did not see them leave the plane. In fact, when the plane was again brought under control the open bomb-bay and the frozen hydraulic fluid made it impossible for the rest of the crew to investigate conditions in the rear of the plane. They did not know that the waist gunners had bailed out nor that the tail gunner was dead until they crash-landed in England [at Eye, home of the 490th Bomb Group]. Neighboring A/C reported seeing the two chutes of S/Sgts Braccioforte and Weitkemper at the time of the attack. Witnesses were the crews of A/C #343 (1st Lt C.L. Bell, pilot) and A/C #544 (2nd Lt H.W. Prouse, pilot).” In the bottom photograph, the six men who did make it home, pose with their crash-landed bomber shortly after their safe return. Left to right: 2nd Lt William Forde, navigator; TSgt James Reynolds, Radio Operator; 1st Lt Harry Whyte, Pilot; 2nd Lt John Martin, Co-pilot; TSgt Glenn Barnes, Engineer; 2nd Lt Harry Green, Bombardier. In the background can be seen the damaged tail turret where Wehunt was killed. Photo: Top: Imperial War Museum; Bottom: AmericanAirMuseum.com](https://images.squarespace-cdn.com/content/v1/607892d0460d6f7768d704ef/1627508321626-3AGEDY6QHOA1RXGDYXRO/RightPlace110.jpg)
A story to be told. Some photographs don’t have to be overly dramatic to deliver an emotional blow. This photo of an Eighth Air Force B-24H Liberator in the haze and about to make a forced landing at RAF Eye in Suffolk hits me hard. It speaks to the fact that the six remaining men aboard are now all alone, encased in a wounded metal machine and about to attempt an uncertain landing with heavy damage. The aircraft had been mauled by enemy fighters over France with severe damage to its tail turret, fuselage and hydraulic system. The tail gunner had been killed instantly, and the two waist gunners had bailed out. The training for the pilots is now kicking in, the only means by which they can save themselves. There is something about the haze, the church steeple and the distance that speaks to their plight. It looks misty and silent and it seems their trial is near its end—but this is the most dangerous time, and those young American men we can’t see inside that shape are scrambling to save their lives. The Ford-built (Willow Run factory) Liberator (42-95025) of the 579th Bomb Squadron of the 392nd Bomb Group, piloted by Lieutenant Harry A. White, crashed at Eye on 15 June 1944. The six men survived. The following 392 BG intelligence report demonstrates the severity of the damage—something you cannot see in this photo: “On the mission of 15 June 1944 to a bridge at La Frillière, near Tours, A/C #025, piloted by 1st Lt Harry A. White, Jr, was attacked by E/A. The exact time and place of the attack could not be ascertained from Lt White’s crew, who had their hands full dealing with battle damage and flying the plane home. From interrogation of the crew in the hospital the next day and from crew reports of A/C nearby in the formation, the attack is estimated to have begun at about 0658 hours in the vicinity of (4749N-0119E) [59 km/37 mls northeast of their target – editor]. Five or six Fw 190s, from a group of 20 or more, attacked our formation. Three of these attacked Lt White’s plane—one from either side and behind, one from the rear and below. The plane was badly hit by 20-mm shells and machine gun fire. The tail gunner, S/Sgt J. Wehunt, was killed, and the waist gunners, S/Sgts Braccioforte and Weitkemper, bailed out. The tail structure and turret were ruined. Shells and bullets entered the fuselage near the waist windows on both sides. Oxygen bottles exploded, and a 20-mm shell burst on the flight deck, wounding the engineer, T/Sgt Glenn M. Barnes, in the face and neck. Smoke filled the plane. The hydraulic system was shot out, rendering the bomb-bay doors inoperative, and escaping fluid poured through the plane, freezing to the floor and sides. Bombs were salvoed through the bomb-bay doors. No. 3 engine ran away. Rudders and trim tabs were out, and the plane was flown home (with the 93rd Bomb Group) by main force and the skill of the remaining crew. The intercom was out. S/Sgts Braccioforte and Weitkemper, at the waist guns, presumably bailed out when fire from attacking planes came into their positions. It should be emphasized that in the confusion of the attack their own crew did not see them leave the plane. In fact, when the plane was again brought under control the open bomb-bay and the frozen hydraulic fluid made it impossible for the rest of the crew to investigate conditions in the rear of the plane. They did not know that the waist gunners had bailed out nor that the tail gunner was dead until they crash-landed in England [at Eye, home of the 490th Bomb Group]. Neighboring A/C reported seeing the two chutes of S/Sgts Braccioforte and Weitkemper at the time of the attack. Witnesses were the crews of A/C #343 (1st Lt C.L. Bell, pilot) and A/C #544 (2nd Lt H.W. Prouse, pilot).” In the bottom photograph, the six men who did make it home, pose with their crash-landed bomber shortly after their safe return. Left to right: 2nd Lt William Forde, navigator; TSgt James Reynolds, Radio Operator; 1st Lt Harry Whyte, Pilot; 2nd Lt John Martin, Co-pilot; TSgt Glenn Barnes, Engineer; 2nd Lt Harry Green, Bombardier. In the background can be seen the damaged tail turret where Wehunt was killed. Photo: Top: Imperial War Museum; Bottom: AmericanAirMuseum.com
Related Stories
Click on image

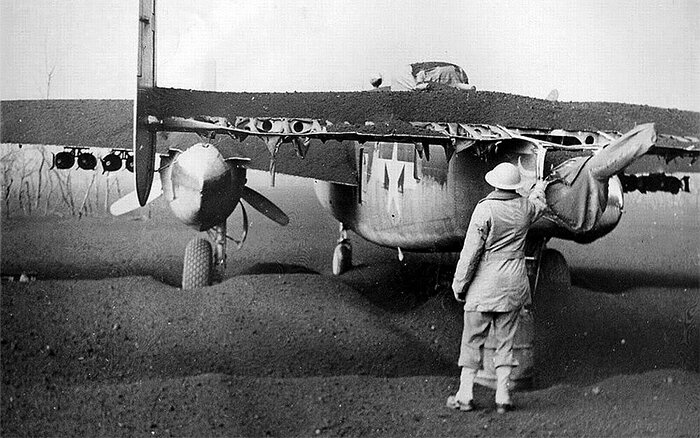
Designers and operators of military aircraft expect to have to deal with things like battle damage, rough handling by inexperienced pilots and the odd snow or hail storm—but being weighted down by thousands of pounds of hot ash was not in the manual. Between 18 and 23 March 1944, Mount Vesuvius, the one-time destroyer of Herculaneum and Pompeii, erupted and spewed ash, rocks and hot cinders southeast across a wide swath of the coast of the Bay of Naples, all the way to the Gulf of Salerno. Here a B-25 of the 340th Bomb Group at Pompeii Airfield sits forlornly under many inches of heavy hot ash following the eruption. There was nothing the 340th could do until the eruption had ended. Embers burned away fabric-covered control surfaces, etched Perspex in turrets and cockpits, entered interiors and caused considerable damage. The weight of the ashes on the horizontal stabilizers caused many of the B-25s to tilt aft, burying their tail guns even deeper under ash. The soldier in the foreground is wearing a helmet and heavy jacket to protect him from falling ash and rocks. Photo: USAAF


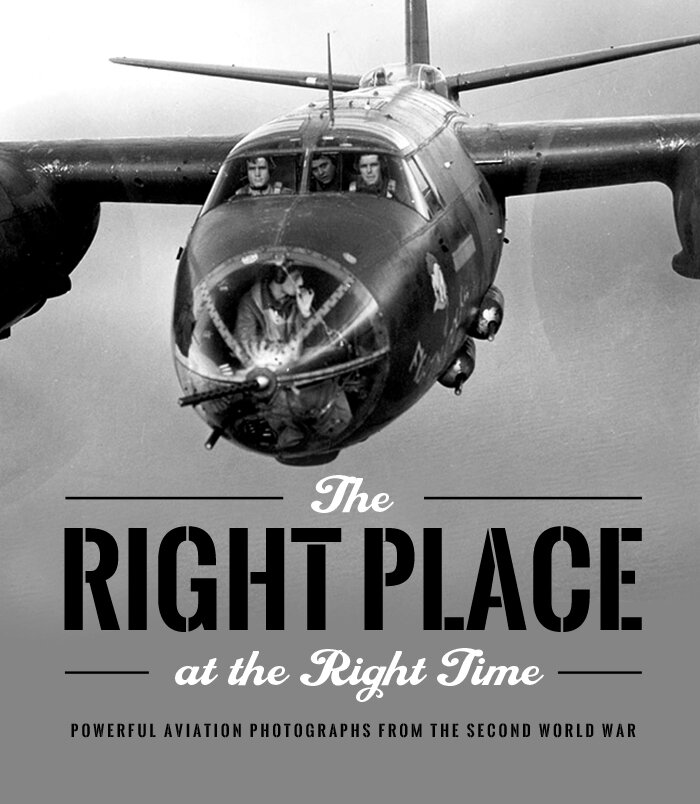
The nose gunner of this England-bound Heinkel He 111 (Top) in the summer of 1940 had the best view of the action ahead possible, but he must have felt pretty vulnerable sitting at altitude in a glass bubble with angry Spitfires and Hurricanes rising to meet him like wasps from a disturbed nest. The pilot, navigator and bomb aimer sat well back of the nose gunner in this big glassy greenhouse cockpit, an iconic design long-associated with the Battle of Britain and the Blitz. With the big Jumo 211 V-12s turning three-bladed Jumo wooden props, it must have made for a noisy flight for the man in the nose. The He 111 was the most numerous of Luftwaffe bombers in the early stages of the war and was built from 1935 through to 1944. The bottom photo shows us just how great the Heinkel’s gunner’s forward visibility and vulnerability really was. Photo: Top: Pixtale.net; Bottom: Bundesarchiv

There’s something about this photo that has always drawn me in. Perhaps it was the earnest and cheerful good looks of the five young men crammed into the forward compartment and cockpit of this Avro Anson trainer—young men who are clearly competent and proud of what they are doing. It’s difficult to find information on the image, but I found one post on Pinterest that claimed the pilot (in hat) was Harold Craven Billerwell of the Royal Australian Air Force and the date was August of 1945. If this is the case, then this is a shot of the one Avro Anson operated by 99 Squadron of the RAAF, a heavy bomber squadron raised late in the war for service against the Japanese. The squadron was stood up at the beginning of February 1945 at Leyburn in Queensland and equipped by March with B-24 Liberators. The squadron owned a Tiger Moth and an Anson, for liaison purposes most likely. The unit was transferred to Jondaryan, Queensland in June of 1945, but the war was over soon after and the squadron flew mostly transport duty until stood down in June of 1946. Some of that transport duty was repatriating Australian service people after the war. Photo: Pinterest

Preparing the place from which Japan’s end will come. In July of 1944, the crew of a Grumman Avenger of the United States Navy flies past the Japanese-held Ushi Point Airfield, which they have just attacked on the island of Tinian in the Marianas chain. The black plumes of smoke from burning Japanese aircraft signal the coming wreckage of the Japanese empire and homeland. As soon as the US Marines had secured the field, Navy Seabee construction battalions began work on constructing an airfield capable of B-29 Superfortress operations. A year after this photo was taken, a B-29 named Enola Gay would take off from here, bound for a city hardly anyone had heard of —Hiroshima. A week later, another B-29 named Bockscar also lifted off from this place, bound for Nagasaki. Photo: US Navy

Almost didn’t make it home. While this well-timed photograph of a landing P-51 Mustang (F-6 Photo Recce variant) ground-looping and crashing into a parked aircraft is powerful enough to make it into this story, it’s the date of the crash, 8 May 1945, that makes it truly dramatic for me. This pilot, likely having fought his way across Europe, very nearly kills himself on VE Day at a captured German airfield (Bad Aibling, Bavaria) when he slams into a wrecked Luftwaffe fighter (a Messerschmitt Bf 109 K-4). The scene is stranger still as, according to the Imperial War Museum notes with this photo, the German fighter had just crashed a few moments before. Since it was after the German surrender, the Luftwaffe fighter was possibly being flown by another American pilot having a little fun with a Nazi aircraft. Bad Aibling was a postwar boneyard for hundreds of Luftwaffe wrecks. These boys were lucky to get home alive—the Mustang pilot, Captain Fred Buell of the 22nd Tactical Recon Squadron walked away with cuts and bruises… and possibly a major chewing out by his commanding officer. Photo: Associated Press via imperial War Museum

It was a small aircraft, but a large hat! A curious Finnish soldier pokes his head inside the cockpit of a nosed-over Russian Polikarpov I-16 on the Finnish-Russian front. This was during the second war between the two nations, known as the Continuation War. The Soviet pilot of the I-16 had made a forced landing near the village of Riiska on the shores of Lake Suvanto in Karelia. The diminutive but pudgy I-16 was a target for many nicknames, mostly mocking. The Russians called it the Isak (Donkey) or Ishakok (Burro) while their Finnish opponents called it the Siipiorava (Squirrel). It was used during the Spanish Civil War, where it was known as the Rata (Rat) by the Nationalists and the Mosca (Fly) by the Republicans. Photo: Pinterest

“Not a total loss Chief… we brought the prop home with us!” Master Sergeant James Smith, the Crew Chief for a Boeing B-17 Flying Fortress named Patches, inspects the damage to “his” ship after a 379th Bomb Group raid to Pas de Calais on 8 May 1944. The prop, blown off after it was struck by flak, embedded itself in the wing and fuselage, just missing the head of Staff Sergeant Jack Guill, Patches’ radio operator. The pilot, 2nd Lieutenant Walter Miller of Louisiana, nursed the busted Fortress home to RAF Kimbolton, but we can only imagine the worries they had about damage to the wing or the possibility that the prop might fly off and strike the horizontal stabilizers. Photo: Imperial War Museum

If you read enough memoirs from Battle of Britain pilots, you will come across numerous descriptions of the standard Luftwaffe bomber formations that came across the Channel from France. They were often described as massive “stairs”, “escalators” or even “cascading waterfalls” with succeeding flights of bombers stepping up and back from the lead group over great distances. In the book The Spitfire Luck of Skeets Ogilvie, Ogilvie describes the formation being “all piled up like… the moving staircase at Piccadilly Circus”. This is sometimes hard to grasp, but this is the first photograph I have seen that illustrates this standard Luftwaffe formation perfectly. Viewing from the dorsal gunner’s position in a leading Heinkel He 111, we can find 20 aircraft in this one compact photograph. Can you find them all? Photo: Imperial War Museum

There is a moment in battle, a breathtaking pivot when pilots move from getting to the target to attacking it—a moment when they change from drifting albatrosses to swooping hawks. It is a dramatic moment, which today we can see in a battle break over an airfield where warbirds or modern fighters are arriving. A peacetime break over the field enables wide separation between landing aircraft as they enter the downwind leg of the circuit—it’s called “coming off the perch”. In battle, aircraft come off the perch one right after the other without pause and it always makes for a determined and dramatic warrior moment—the battle engaged, the lives put on the line, the avenger come down to mete out punishment. Here, four (five if you count the camera ship) Messerschmitt Bf 110 G-2 Zerstörers roll into the attack on the Russian front in 1943, loaded for bear with nose cannon, massive 21 cm. rocket tubes and belly panniers with machine guns. What a frightening sight these would have made, coming toward you as you huddled nearly frozen to death in your trench. Photo: Pinterest

There were many ways to die flying from aircraft carriers during or, as in this case, after the Second World War—on operations, running out of fuel, getting lost out on the ocean or just getting back on board after a dangerous mission. Here a Curtiss SB2C-5 Helldiver of US Navy Squadron VB-92, The Battling Beasts, stalls and rolls inverted after having missed the wire aboard USS Lexington (CV-16). The fates of the pilot and his gunner are sealed. The squadron took their nickname from the nickname of the Helldiver—The “Beast”. The Helldiver that replaced this particular Number 208 airframe was on display at the National Naval Aviation Museum in Pensacola, Florida but now has returned to the National Air and Space Museum’s Udvar-Hazy Center. Photo: National Air and Space Museum

A radar operator/navigator of 125 Squadron RAF settles into his position in the aft fuselage of a Bristol Beaufighter prior to launching a night operation from Exeter in September 1943. The Beaufighter, an exceptionally effective aircraft developed from the heavier Beaufort torpedo bomber, proved to be well-suited to the night fighter role, for which the Royal Air Force (RAF) initially deployed the type during the height of the Battle of Britain, in part due to its large size, allowing it to accommodate both heavy armaments and early airborne interception radar without major performance penalties. I like to imagine what men like this would experience from as they flew into action—the view at 15,000 feet over a blacked out London, the sweeping blue-white beams of searchlights, the cathode-ray light within the Perspex bubble, the moonlight shimmering off the arcs of the propellers ahead, the blue suppressed flames flickering from exhaust ports and the high-pitched talk and directions given to his pilot. Photo: Imperial War Museum

Perhaps a little too close for comfort, yet comforting still, a yellow-nosed Republic P-47D Thunderbolt piloted by 1st Lieutenant Vernon R. Richards slides in close to an Eighth Army Air Force B-24 Liberator en route to Ludwigshaven. Known as “Little Friends”, fighter escorts like this beefy P-47 nicknamed “Tika” from the 374th Fighter Squadron at RAF Bottisham were a welcome sight to bomber crews who began their war in the summer of 1942 without adequate fighter escort cover for daylight missions. Photo: USAAF

One story leads to another. In researching the story behind the previous photograph showing a P-47 sidling up next to a Liberator, I was able to determine the pilot’s name—1st Lt. Vernon R. Richards. That name rang a bell. Vern Richards was the pilot in one of the most well-known and ubiquitous portraits of an American fighter pilot of the Second World War. The image, with notes for his mission inked on his cigarette hand depicts the stress, the exhaustion and the steely resolve of Allied fighter pilots in the Second World War. He went on to fly Mustangs by the end of the war. His “Tika IV” P-51 Mustang is also the subject of one of the best-known P-51 photos of the war. This fellow was somehow a magnet for photographers! Richards, an ace, survived the war and died at age 72 in July 1989 at Felts Mills, New York. Photo: USAAF

At first quick glance, one might think this was two Fairey Battle light bombers flying in very tight formation or even an aerial rear-ending, but it is a dual-cockpit, dual-control Battle trainer known as the Battle T. About 100 of the strange looking aircraft were built, many being converted versions of standard Battle aircraft. The Battle has long been maligned as one of the worst aircraft of the Second World War, underperforming as a light bomber and swept from the skies over France by the Luftwaffe. Regardless of its failures in a combat role, it saw journeyman service as a target tug and gunnery training platform in Great Britain and across Canada with the British Commonwealth Air Training Plan. This Battle T (R7365) was with No. 1 Service Flying Training School at RAF Netheravon, Wiltshire, which is today the oldest military flying training school in the world. Photo: Imperial War Museum

“Unleash Hell”, as Maximus said in the movie Gladiator. Here, a Hawker Typhoon pilot, guided by the splashes of his four 20mm cannon, toggles off a full salvo of rocket projectiles at a hapless tugboat caught in the open in the Scheldt Estuary in the Netherlands in September of 1944, prior to the Battle of the Scheldt. The crew of the tugboat could look over their shoulders, but there was nothing they could do about the oncoming death. One wonders if the rockets and the boat met at some point just in front of where the boat is now, or if these men lived to see another day. Photo: Imperial War Museum


Oil leaks come in many sizes, but I have never seen one that caused this sort of damage. Standing on the wing of his Republic P-47 Thunderbolt is 1st Lieutenant Edwin L. King of the 347th Fighter Squadron of the 350th Fighter Group based in Pisa, Italy. On the web, I came across differing stories as to how this happened. One place stated that during a sortie escorting a formation of B-25s of the 12th Air Force, he was attacked by a small number of Messerschmitt Bf 109s from the 2nd Gruppo and the combat resulted in a blown cylinder and a geyser of pressurized oil gushing back. In another, it seemed he was strafing ground targets when he was hit by flak. Either way, it’s a stunning piece of airmanship. The shear amount of black oil that has blown back across the fuselage and canopy is staggering. With the loss of so much oil (28 gallons according to the P-47 Pilot’s Flight Operating Manual) and a cylinder, he likely did not make it back to Pisa, which was more than 250 km away—he must have landed at a forward operating base. Sliding the canopy back, he would have landed with his head in the slipstream and a good crab on. Thankfully, he had an oxygen mask. We can just see the emblem of the 347th FS on the nose. King, who had enlisted in the Army Air Force in Ohio the day after Pearl Harbor, survived the war with 125 missions completed. He went on to a career in corporate aviation, once flying for Walt Disney. He died last year at the ripe old age of 95 in Pinehurst, North Carolina. Photos: waralbum.ru

While we are on the subject of guys named Edwin who had a brush with death in a P-47 Thunderbolt, how about this shot of Lieutenant Edwin “Lucky” Wright of the 404th Fighter Group. Lucky Wright’s propeller blade was hit by flak in October of 1944 over Münster, Germany, and despite what must have been severe vibration, Wright pressed home his bombing attack, managed a “spot” of strafing and then returned to base at St. Trond, Belgium where he found a nine inch hole in his 11-inch propeller blade. Had the flak struck an inch on either side, the blade would have been severed and the aircraft lost. It was the sixth time that Wright had been struck by flak, hence the name “Lucky”. It was his 39th mission and his luck continued, eventually surviving 88 missions in his trusty “Jug”. Wright was called up again to fight in the Korean War and left the USAF as a major. Photo: USAAF
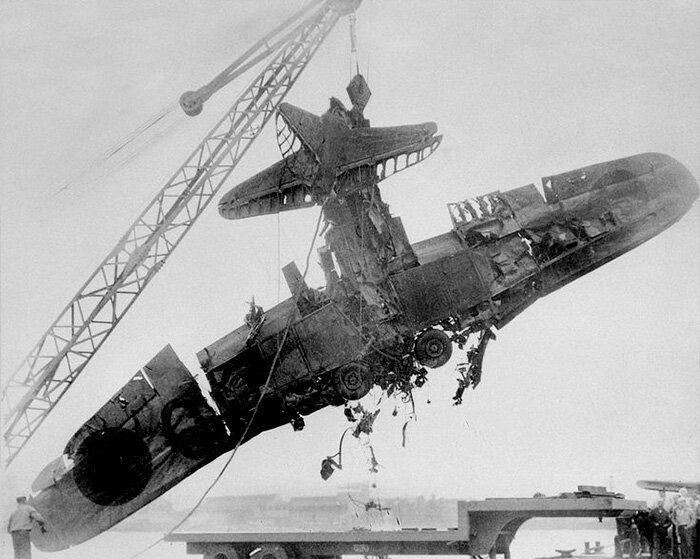
During the Second World War, many tens of thousands of aircraft crashed into the sea, out of fuel, lost or shot down by fighters or anti-aircraft fire, but few of them were ever recovered. There wasn’t time nor benefit from the expense and difficulties faced. This Japanese Imperial Navy Nakajima B5N Type 97 torpedo bomber was an exception. It was from the aircraft carrier Kaga and was flown by Lieutenant Mimori Suzuki with his two crew members—Warrant Officer Tsuneki Morita (bombardier/navigator) and Petty Officer Second Class Yoshiharu Machimoto (radio operator/rear gunner). Mimori’s “Kate” was one of five that failed to return to Kaga on that “Day of Infamy” and was shot down as it flew over Pearl Harbor’s submarine pens. It was determined that a single bullet or cannon round struck Suzuki’s suspended torpedo and detonated it. Photo: US Navy


At first I thought this was a shot taken in winter. The pilot of this P-47D Thunderbolt nicknamed Greek, had propeller control failure and crashed at RAF Halesworth in Suffolk, England on 5 September 1943. The aircraft was flown by Lieutenant Warren M. Chapman at the time. In the top photo, we see Greek in better times (LM-G at rear of formation), flown by Lieutenant Harry Coronios of Lowell, Massachusetts (likely the Greek American who named her) with other aircraft of the 67th Fighter Squadron, 56th Fighter Group. Though Corionos was not involved in this crash, he was killed two months later on operations as a result of bad weather. Photos: Top: Pinterest; Bottom: Imperial War Museum

Two crewmembers of an American Douglas A-20 Havoc (Uncle’s (Sam) Fighting Females) pretend to do maintenance of the four 50 Cal machine guns in the nose of their ground attack version of the type. Each gun bears the name of a women’s service unit operating in Great Britain at the time: WACS (Women’s Army Corps), WAAFS (Women’s Auxiliary Air Force), WAVES (United States Naval Reserve (Women’s Reserve), known under the acronym WAVES as Women Accepted for Voluntary Emergency Service) and SPARS (United States Coast Guard Reserve).

The war stops for no one… not even God. As deck crew bow their heads during Divine Service aboard the escort carrier HMS Fencer in February 1944, a Wildcat pilot sits alone in his cockpit in case the air boss needs to launch defensive fighters against attacking aircraft. The Wildcat is strapped to the bridle and the catapult, ready to go. Given the time stamp, this Wildcat would have been with 842 Squadron, Q Flight. Photo: Imperial War Museum
As a group of Air Force officers looks on in May of 1943, a test “bouncing bomb”, code-named Upkeep, bounds out of the water and on to shore at the Reculver Bombing Range in the county of Kent. The nonchalance of the men in the scene belies the importance of these tests. Closer than anyone, the man on the left is Barnes Wallis, famed inventor of a number of secret British aerial weapons including the Upkeep bouncing bombs, as well as the Grand Slam and Tallboy bombs that were used to destroy difficult targets like submarine pens, viaducts and the battleship Tirpitz. Shortly after these tests, Lancasters of 617 Squadron (including 32 Canadians) took off on Operation CHASTISE with one bomb each to take out the Möhne, Eder and Sorpe Dams in the industrial Ruhr region of Germany. Looking at this photo, I can hear the heavy thudding splash, the roar of the Lancaster overhead and the cheers of 56-year-old Wallis as he urges it on. Photo: Imperial War Museum

Camo Cameo. A Bristol Blenheim Mk IV of 226 Squadron, Royal Air Force hides among the fields and roadways of England at haying time in August of 1941 (note the hay bales in tidy rows below). Though the Blenheim was not as capable as the Havocs and Mitchells that the squadron would soon operate, it was far better than the Fairey Battles with which they entered the fray during the Battle of France in early 1940. The unit suffered heavy losses, their Battles being no match for the Messerschmitt Bf 109s and 110s of the Luftwaffe. Photo: Imperial War Museum

I love when camouflage seems to work—at least in a photograph. This Lockheed Hudson of 206 Squadron, Royal Air Force seems to disappear into the rural British landscape below. Interestingly, 206 Squadron was a Coastal Command unit with over-ocean patrols where forest camouflage might actually be a detriment. I suppose it was good for when returning to base. The squadron operated the type from RAF Bircham Newton with detachments at RAF Carew Chariton and RAF Hooten Park (could there be more British-sounding bases?) for two years before the summer of 1942 when they converted to Fortresses and Liberators for long mid-ocean operations. Photo: Imperial War Museum

In addition to camouflaging aircraft, the RAF tried to hide entire airfields amidst the clutter of surrounding farm land. Here the large grass airfield (no runways meant aircraft could always take off and land into wind) at RAF Feltwell in East Anglia, England can be seen “painted” with a mimicked farm pattern. While many airfield perimeters encompassed actual functioning farmlands, it was never in the actual flying area. We can see the dispersal pads or perhaps munitions magazines at lower right. Feltwell was home to medium and heavy bomber squadrons throughout the war and was near more famous airfields such as Mildenhall, Bury St Edmunds and Lakenheath. Today, you can still see the field via Google Maps, but it is now home to the Feltwell Golf Club. Photo: Imperial War Museum

Some efforts at camouflage were more elaborate than others. Here, at a captured German air base at Melsbroek, Belgium, Royal Air Force Hawker Typhoons of 124 Wing, Second Tactical Air Force undergo maintenance at a hangar facility disguised as a row of apartment and shops. The disguise included mansard roofs, windows and chimneys and likely looked pretty real from the air. One wonders if attacking pilots ever asked the question: “What is a row of houses and shops doing at an airfield?” In the foreground, a rocket-rail equipped 247 Squadron Tiffie gets some engine work done, while in the background, a 181 Squadron Typhoon is up on jacks. In the foreground are stacked auxiliary fuel tanks for the thirsty Typhoons. Photo: Imperial War Museum
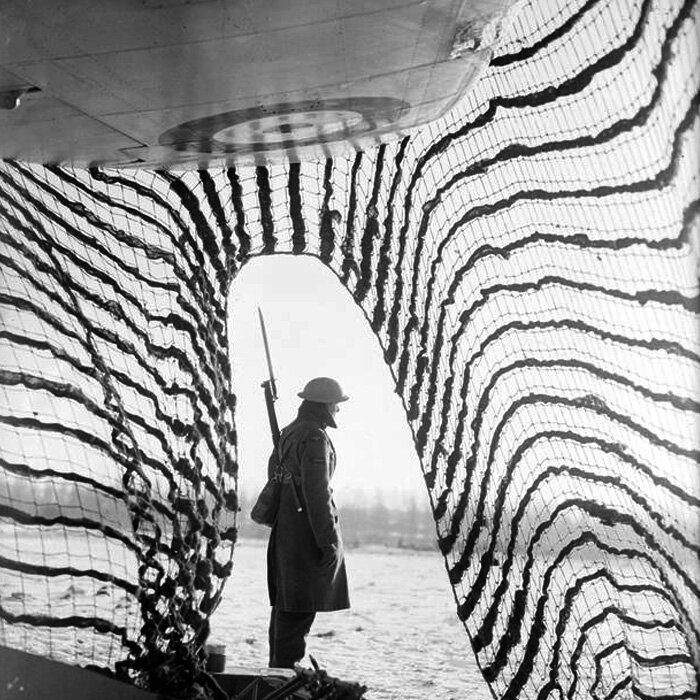
Even a Royal Air Force combat photographer is an artist at heart. This artistic shot, taken at British airfield near the village of Bétheniville, France (in the Champagne district) during the winter-long “Phoney War”, frames a British soldier standing guard in the snow over a parked and camouflaged Bristol Blenheim Mk IV of 139 Squadron. The photograph was likely taken around the time that the squadron was moved from Great Britain to France in December of 1939. The Blenheims of 139 Squadron were the first aircraft to engage the Germans—one day after war was declared on 3 September 1939. It was on that same raid against German ships at Wilhelmshaven that the first Canadian died during the war—Albert Stanley Price, a Blenheim pilot with 107 Squadron, Royal Air Force.

Elephant power replaces horse power. At Royal Naval Air Station Puttalam in Ceylon (now Sri Lanka) during the Second World War, Fifi the “Duty Elephant” was a legend who brought smiles to the faces of Fleet Air Arm aviators long after the war. With fuel at a premium, roadways and taxi strips almost impassable after monsoon rains and tow vehicles prone to breakdown in the humidity and tropical temperatures, Fifi and other Indian elephants saw plenty of work towing fuel bowsers and aircraft like this Royal Navy Fleet Air Arm Corsair fighter. Photo: Imperial War Museum

Imagine finding one of these in the rear view mirror of your Nakajima Hayabusa. There’s something about the curious cropping of this LIFE magazine photograph of a United States Navy Corsair that speaks to me… raw, spirited, powerful, bloody dangerous and sneaking onto frame. Back in the Second World War, camera equipment was not as capable as it is today, but this shooter, obviously sitting in the tail gunner’s position of a bomber, did an admirable job worthy of John Dibbs. The brutish and unpolished look of that big 18-cylinder radial speaks to the original intention for the Corsair—a tough but expendable tool of war. Photo: LIFE via Pinterest

With weather being constantly scorching hot and humid at Royal Naval Air Section (RNAS) Cochin on the Malabar Coast of India, many laborious tasks were jobbed out to unskilled locals, including stripping newly-delivered Fleet Air Arm aircraft of their sprayed-on coating used to protect them in transit. Many of the delivered aircraft, like this Chance Vought Corsair, were lashed to the flight decks of light aircraft carriers and subject to saltwater corrosion during delivery voyages. The Corsairs were wrapped in a strippable coating called Eronel and travelled without outer wing panels and empennage—these were assembled at Cochin and supplied to replenishment carriers or to squadrons based at Cochin for training. “Eronel Spraypeel” was a plastic, sprayed on and peelable product made by Eronel Industries in Connecticut. Photo: Imperial War Museum

If it floats, is powered and carries an aircraft… is it still an aircraft carrier? Here in Colombo, Ceylon (or in any anchorage near a Royal Navy repair depot or replenishment centre), a purpose-built motorized barge takes a Fleet Air Arm Corsair out to a waiting British carrier. The barges were needed when either the carrier could not tie up to a pier for offloading and uploading or when the confines of the harbour and other ships at anchor prevented the aircraft from “landing on”. The Royal Naval Air Station at Colombo was called HMS Bherunda and was established in 1943 at the Colombo Racecourse. The big Royal Navy base at Colombo was called Lanka and perhaps the boat was used for transferring aircraft from a replenishment carrier directly to a fleet carrier. Photo: Imperial War Museum

Contrails forming off the tips of propellers are a common yet always fascinating visual display of physics and meteorology. Here, a Fleet Air Arm Corsair aboard the carrier HMS Formidable begins its takeoff roll at sea in July of 1944, spinning a tidy spiral of vapour from her prop that wraps around the pilot in his cockpit and disappears behind. Despite it being at the height of summer, deck crew and pilot wear warm clothing—suitable for the cold waters near the Arctic Circle where Formidable was taking part in yet another operation (Operation MASCOT) against the German battleship Tirpitz. Photo: Imperial War Museum
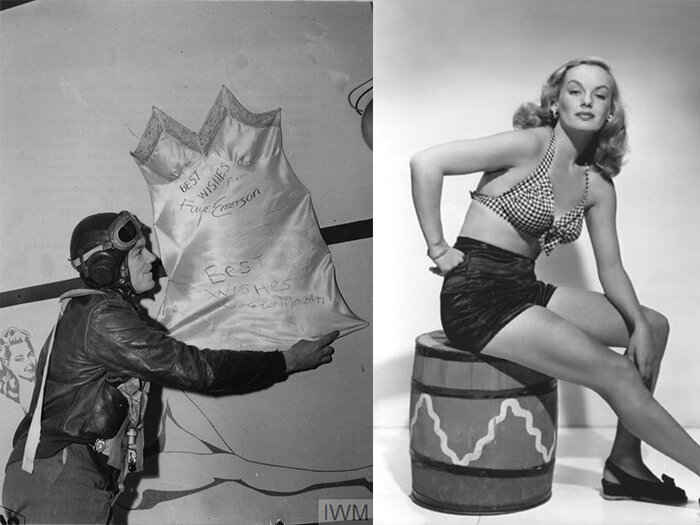

“Undies Boost Mustang Morale” reads the title on the back of this photo (above left). The Second World War may not have been the birthplace of the Pin-up Girl, but this cultural phenomenon is largely associated with the fighting men of that time. Testosterone-fired young men, oceans from their families and “gals”, found titillation and some degree of solace in a sexy Vargas-girl or Hollywood starlet pin-up—taken from magazines or even hand-painted on mess walls and aircraft. In the photo at left, Major John Brooke England pins a satin slip autographed by actresses Faye Emerson (top right) and Delores Moran (bottom right). The pilots of 357th Fighter Group had written to a number of starlets, requesting that they donate unwanted under garments to decorate their squad room. Several young ladies agreed, if only the men would “knock down an enemy plane and shoot up a few targets for them”. In the words of the excited fighter pilots, “we shot up everything that looked like a target.” Then the underwear started to come in. Film actress Marjorie Riordan (bottom left) sent a pair of autographed panties, while Fay Emerson sent the boys one of her satin slips with her signature and that of Delores Moran. John England, an ace with 18 victories, was killed in 1954 when attempting to make a dead-stick landing in an F-86 in bad weather in France. England Air Force Base in Louisiana was named after him. Emerson had just recently been married to Colonel Elliott Roosevelt, the son of FDR. Known as the “First Lady of Television”, she went on to a stellar career in the early years of TV broadcasting. Delores Moran had a short career in films, but was best known as a sexy pin-up girl and for her affairs with producers. Riordan, on the other hand, was no bimbo. After a short period of acting in the 40s, she found the life unrewarding and she went back to graduate school to study speech pathology. The one-time pin-up became a clinical psychologist. Moran died of cancer in February of 82, Emerson died of cancer in March of 83 and Riordan died of cancer in March of 84… all of the same disease and each one year apart. Photos: Top Left: Imperial War Museum; Top Right: findagrave.com; Bottom Left: Amazon.com; Bottom Right: wikiFeet

A nice portrait of a navigator aboard a Handley Page Hampden medium bomber of the Royal Air Force’s Bomber Command early in the war. The Hampden, along with the Vickers Wellington and the Armstrong Whitworth Whitley, was a mainstay of the RAF’s Bomber Command in the early months of the war. Though Hampdens were involved in the first night raid of Berlin and the first 1,000-plane raid in Cologne, they proved to be the least capable of the three bombers and increasingly unsuited for modern bomber operations. It was withdrawn from Bomber Command service in late 1942. One can imagine the frightening view afforded this fellow on a night raid over Berlin, sitting at a table in essentially a glass dome while flak bursts all around him. Photo: Imperial War Museum

Into the Battle in Battles. The gunner in a Fairey Battle captures a photograph of Wermacht soldiers running for their lives (just above horizontal stabilizer) after their convoy was strafed by his pilot. After the Phoney War, a period of some eight months after 3 September 1939 when the Germans and Allies did not engage on the Western Front, the Germans finally began their Blitzkrieg war, slicing into Belgium and France. This was the Battle of France. Against them, the RAF employed untested types like the Westland Lysander and Fairey Battle in combat with the Nazi invaders. Sadly, while they functioned somewhat as hoped when unmolested (as above), they were hopelessly out-classed by Luftwaffe frontline fighters like the Messerschmitt Bf 109. Battle squadrons were soon decimated, while Spitfire and Hurricane squadrons were pulled back to husband those resources for a possible invasion of Great Britain. Photo: Imperial War Museum

If you have never flown in formation in an open cockpit aircraft, you have missed one of the great joys of aviation—wind buffeting your face, heat blasting back from the engine, its howl drowning out that of aircraft just feet away, the thrum of wires slicing the air, aircraft rising and falling like fish in a fast moving stream. It’s all so dramatic and purposeful. Here we see a formation of Hawker Audax biplane fighters of 28 Squadron, Royal Air Force, based at RAF Kohat, India (now Pakistan) on their way to an outpost at Miramshah on the Waziristan Frontier. The Audax was a variant of the Hawker Hart light bomber used for army cooperation. Though the Audaxes were outdated by the beginning of the war, 28 Squadron would not get a replacement aircraft until September of 1941 when they received their first Lysanders—hardly the type of aircraft needed to fight the Japanese in Burma. Photo: Imperial War Museum

From swords to ploughshares. Hundreds, if not thousands, of Boeing B-17 Flying Fortresses and Consolidated B-24 Liberators await destruction on death row at Kingman Air Force Base, Arizona after the Second World War. Within a year of the end of hostilities, some 34,000 military aircraft of the US Navy and Air Force had been flown in to storage facilities at 30 locations across the USA, including Kingman, which was known as Storage Depot No. 41. In all, more than 117,000 aircraft met their end in a similar fashion by the time the program was finished. The process of turning these old warbirds back to aluminum is best described in this excerpt from the website airplaneboneyards.com: “The contractor for aircraft scrapping at Kingman was the Wunderlich Contracting Company of Jefferson City, Missouri, who received an 18-month contract from the federal government for $2.78 million to reduce 5,400 aircraft to aluminum ingots. Active duty military personnel typically flew the aircraft into Kingman, and civilian employees would handle parking and classification. To accommodate the large numbers of employees, tent cities were erected on site. In subsequent months, brand new aircraft directly from assembly lines were even disposed of at Kingman. Fuel was drained from the aircraft and sold. Aircraft engines were then removed and placed in rows on the desert floor. By the time the planes reached Kingman, most of the ordnance (predominantly .50 cal machine guns and Norden Bombsights) had already been removed at other temporary storage depots. However, a few planes did arrive with some machine guns and a few Norden Bombsights, which were temporarily and securely stored. The guns were retrieved by the government, but the Nordens were ‘demilled’ using a sledgehammer. Interior items of the aircraft such as radios, oxygen equipment, handguns, manuals, life rafts, fire extinguishers and instruments were removed. The main aircraft airframe was then sliced into major pieces using a guillotine. Some hand cutting of smaller parts was also done. The final step was placing parts into the smelter, or furnace, for melting. Three furnaces were operated at Kingman for melting about 70% of an airplane’s metal components into ingots. The furnaces were run 24 hours a day, and could consume up to 35 aircraft a day.” Photo: Pinterest

A peaceful silhouetted shot of a Dewoitine D.520 fighter aircraft of the Vichy French government flying over the coast of Tunisia that belies the turbulence of the French Air Force at the time—the summer of 1940. The beautiful Dewoitine, designed and built by Société Nationale des Constructions Aéronautiques du Midi (SNCAM) was a contemporary of the Spitfire and Messerschmitt Bf 109, but failed to take its place in that pantheon of the great aircraft of the Second World War, due in large part to the capitulation of France. With its cockpit sitting far aft, behind the trailing edge of the wing, it offered great downward visibility to its pilots. Note the foldable ventral antenna mast protruding downward far beyond the length of the extended landing gear. One wonders if it was slaved to the landing gear sequence—the gear goes down, the mast comes up? The lower antenna was for reception while adjustable length antenna on the top was for transmission. The D.520 was used by both the Free French and the Vichy government. Photo: picssr.com

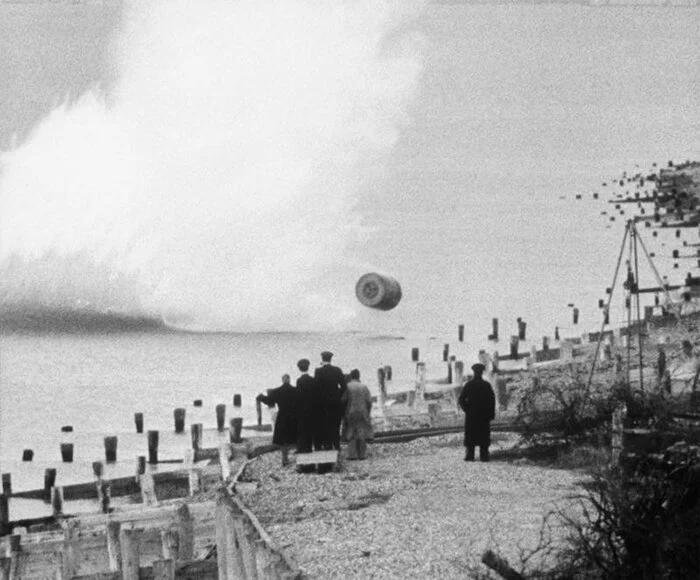
In retaliation for the D-Day invasion, the Germans unleashed an angry fusillade of V-1 flying bombs from sites inland from the Normandy coast. Here, on 14 June 1944, one of the missiles finally runs out of fuel over London and in silence falls toward an unfortunate neighbourhood of that great city. The white steeple at the left is the famed James Gibbs-designed St Martin-in-the-Fields on Trafalgar Square. So long as you kept hearing the V-1, you were safe from its explosive detonation, but when the buzzing racket of the Argus pulse-jet ceased due to fuel starvation, it was smart to find cover, for the missile would stall, pitch over and head towards whatever lay below it. At its peak, more than one hundred V-1s a day were fired at southeast England, 9,521 in total, decreasing in number as sites were overrun until October 1944, when the last V-1 site in range of Britain was taken by Allied forces. Photo: Pinterest

There are many photographs of fighter aircraft test firing tracer rounds from their guns during nighttime, usually jacked up on a test bed and shooting into a gun butt. It made for a dramatic publicity shot. Here, however, an American Republic P-47 Thunderbolt lets loose with its fifty cals while flying tight formation on the photo ship. Photo: USAAF


Attacking a formation of Martin B-26 Marauders in the first months of 1945, this long-nose Focke-Wulf FW 190D of Jagdgeschwader 51 “Mölders” II. Gruppe just escapes the fate of the B-17 Miss Donna Mae II in the previous photograph. The speeds at which he was flying and the bombs were falling means he likely never even saw them as they flashed by. Photo: aviadajavu.ru

With hundreds of townsfolk watching, and swimmers in the water ready to give assistance, Avro Anson K6166 floats in shallow water at Whitstable, Kent on the south coast of the Swale where it enters the English Channel. On 25 June 1936, K6166, a 48 Squadron Anson, flying out of RAF Manston, experienced a port engine failure during a routine coastal patrol and was ditched six miles off the coast. The four-man crew was safely rescued but the Anson remained afloat. Enterprising coastal men towed it back to Tankerton Harbour in Whitstable, but the ditching and saltwater damage to engines and frame meant that it had to be written off. With 48 Squadron being the first to operate the type, beginning in March, this was in fact the first-ever operational accident involving an Anson. Photo: Aviation Safety Network

When legends meet. Winston Churchill, upon watching a Spitfire demonstration in the summer of 1941 at Castle Bromwich, Birmingham, asked to speak with the demonstration pilot, the legendary Alex Henshaw, “The Extraordinary Mr. Spitfire”. Henshaw, a former air racer and the Chief Production Factory Test Pilot for Supermarine, is known to have flown more that 10% of all Spitfires ever made… this representing 2,360 individual Spitfires flown! He also test flew Lancasters, 350 of which were constructed at Castle Bromwich Aircraft Factory. He is the only confirmed person to barrel roll a Lancaster, something he did several times. Photo: Imperial War Museum

On the deck of an aircraft carrier you better have your head on a swivel. A Grumman Avenger of Naval Torpedo Squadron VT-31 “Night Owls” misses the arrestor wires and drifts dangerously over the port catwalk of USS Cabot during operations, as quick-acting sailors try to get out of the way. VT-31 was part of Air Group 31 along with fighter squadron VF-31 and joined the ship at her East Coast commissioning and stayed with her for the better part of a year in the South Pacific. It is not known whether this Avenger managed to climb away safely. Photo: Pinterest

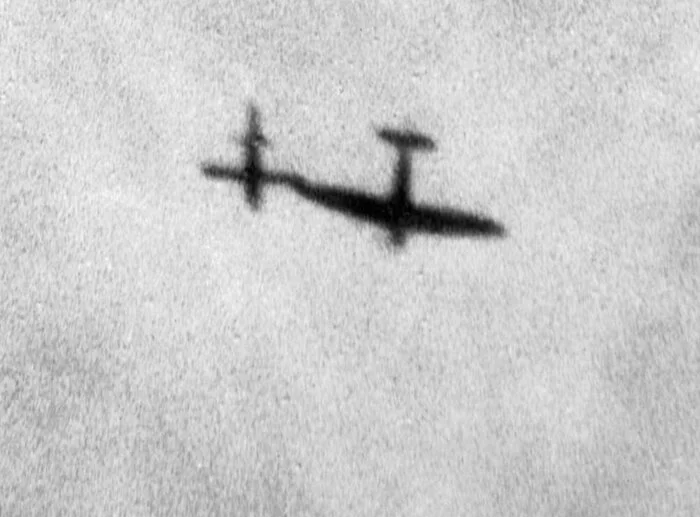
A shadow of a low-flying Avro Vulcan, a cold war icon, crosses over the remains of a tragedy from another war and another time. On 4 April 1943, after attacking targets in Naples, a Consolidated B-24D Liberator nicknamed Lady Be Good disappeared while returning to base in North Africa. It was assumed that the Liberator and its crew had crashed after overrunning their base perhaps out of fuel or suffering fatal battle damage. It was the very first mission for pilot Lieutenant Bill Hatton and his crew. Nothing was learned about their fate until, in 1958, a British petroleum exploration crew came upon the near intact wreckage of Lady Be Good some 700 kilometres inland in the Libyan Desert. There was no evidence of any of the crew—it was clear that they had all bailed out. In 1960, an effort was made to find the remains of the crew and all but one of the nine-man crew were found—the farthest remains were 200 miles from the crash site. It seems, according to a diary found with the body of the co-pilot, that eight of the nine had survived the bail out. Without water, the group of eight, which had assembled after shooting off flares, survived together for more than a week. The wreckage, pin-pointed on the map, became somewhat of a curiosity for RAF aircraft, such as this Avro Vulcan, operating on the area. The story of Lady Be Good would become the basis for a Twilight Zone episode called King 9 Will Not Return. Photo: Pinterest

Fearsome angels of death—three Ilyushin Il-2 Sturmoviks of a Red Army Ground Attack Unit unleash hell on German positions on the Eastern Front during the Battle of Kursk. I love this photo because the bright flash of the cannons blow the aircraft into stark silhouette as the section appears to dive though smoke and cloud (actually, they could be in a more level flight and the photo cropped to make them appear to be diving at a more extreme angle). Regardless, it is one of my favourite images of the “Ilyusha”. Ugly as sin, built like a tractor, the Sturmovik was successful (if inaccurate) against wide-open German positions, convoys, tanks and artillery. Equipped with 20-23 mm cannons, 82-132 mm rockets and dumb bombs, the Il-2 was the bane of the frozen foot soldiers and tank crews of the Wehrmacht. Il-2s at Kursk used the “circle of death” tactic: up to eight Sturmoviks formed a defensive circle, each plane protecting the one ahead with its forward machine guns, while individual Il-2s took turns leaving the circle, attacking a target, and rejoining the circle. Sturmoviks drew nicknames like flies—the Flying Tank, the Flying Infantryman, NATO (postwar) code-name Bark and my favourite, the Hunchback. One of its greatest claims to fame is the fact that it remains uncontested at the top of the list for most-produced aircraft of all time, with 36,183 built and, if you include the later variant Il-10 “Beast”, that number climbs to an astounding 42,330 aircraft. That’s a large host of angels of death. Photo: Wikipedia

While there is no aircraft shown in this photograph, an aircraft is the focus of these Soviet Red Army trainee snipers. Hopefully, there are more aircraft in the sky above them than just one, since they are not all pointing at the same target. I’m assuming they are sniper students as they are all using Mosan-Nagant M91/30 PU rifles, made famous by Red Army snipers like Vasily Zaytsev at the Battle of Stalingrad. Of the top ten snipers in history, all but one were Soviet soldiers and, using their Mosan-Nagants, claimed an astonishing 3,624 Germans killed. The most successful sniper of all time was a Finn by the name of Simo Häyhä who had 705 confirmed kills of Soviet Red Army soldiers. While sniper rifles do not make an adequate anti-aircraft defence, it’s not impossible to bring down an aircraft with a single shot. This was likely a public relations photo as all of the men have somehow managed to keep their caps on. Photo: forgottenweapons.com

The diminutive Pilot Officer Vernon Charles “Shorty” Keogh may have been the smallest pilot of the entire Royal Air Force, but he had the heart and courage of a giant. At 4’-10”, Shorty had to use two seat cushions when flying his Spitfire with 609 Squadron. Born in Elizabeth, New Jersey, he was an air show pilot and had an astonishing 500 demonstration parachute jumps to his credit. He first travelled to Europe to join the Finns in their fight against Russia, but by the time he got there, that fight was over. He then attempted to join the French Air Force during the Phoney War, but was shunted about without ever getting into a squadron or flying an airplane. With the fall of France, he managed to get to England aboard the last boat leaving, was accepted in the RAF and joined 609 Squadron at the height of the Battle of Britain. Following the end of that great aerial battle, he joined two American friends from 609 Squadron (the burly Andy Mamedoff and Eugene “Red” Tobin, both of them having been with him in France) and joined the newly-formed 71 Squadron, one of the famous all-American Eagle Squadrons in which heroic Americans fought for the RAF long before America was pushed into the war. Here we see the three men (Tobin on the left) together at RAF Church Fenton where the squadron was forming. Mamedoff (right) is pinning an Eagle Squadron badge on Shorty’s sleeve. During the Battle of Britain, Keogh participated in the shooting down of the Luftwaffe’s only flame-throwing bomber—a Dornier do 17—on 15 September 1940, the day we celebrate as Battle of Britain Day. He was killed on operations with 71 Squadron the following year. His body was never recovered. Photo: Imperial War Museum

During an attack on the Japanese island of Sakishima during Operation ICEBERG, the Allied attack on Okinawa, a Royal Navy Fleet Air Arm Grumman Avenger is forced to ditch next to the Royal Navy escort carrier HMS Smiter after its engine failed on takeoff. I love to stop and look around these images, to see the story they tell—in this case a dramatic story of a crew scrambling to survive, but looking out for each other. The turret gunner runs along the port wing while the pilot stands on the starboard wing and is possibly looking at the radio operator and ventral gunner who can be seen swimming aft of the port side tail plane. It looks as if the Avenger would stay afloat for a long time, but it was matter of just seconds before the 18,000 lb fully-loaded aircraft heads toward the bottom of the ocean. Photo: Imperial War Museum
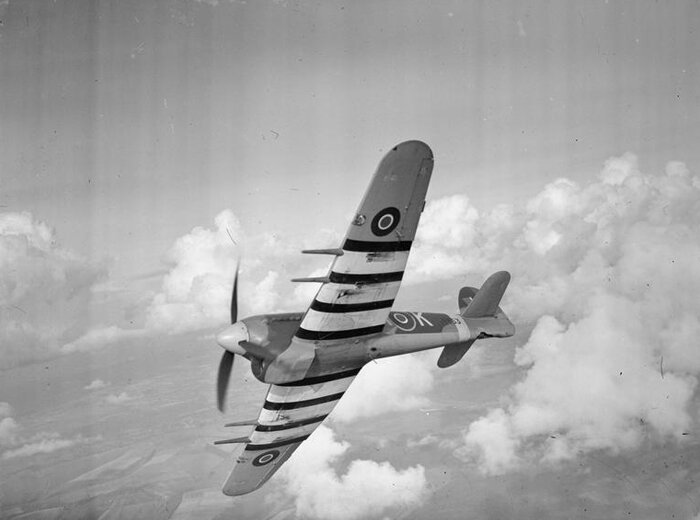
D-Day Typhoon? I’d bet that most people looking at this shot of a Hawker Typhoon IB of 486 (New Zealand) Squadron banking away from the camera in October of 1943 would think it was flying with the famous D-Day stripes or “wasp wings”, but they would be wrong. D-Day identification stripes, painted on to help Allied anti-aircraft gunners tell friend from foe during the chaos of the Normandy landings, were two black and three white stripes of equal thickness wrapped around each wing and the aft fuselage. The stripes in this photo are four thinner black stripes enclosing three wider white stripes. While the purpose of these stripes is the same, they predate Operation OVERLORD, the D-Day landings, by years. When the Typhoon was first introduced in combat in September of 1941, its wing shape and heavier nose in silhouette at altitude led some Allied gunners and even fighter pilots to mistake it for a Focke-Wulf Fw 190. The first two Typhoons that were lost in aerial combat were shot down by Spitfires. In December of 1942, the Royal Air Force introduced the stripes underside the wings after trying other schemes such as the entire nose painted white and a single yellow stripe. The success of the striping led the Allies to adopt a version of it for D-Day—the stripes known as “wasp wings”. Photo: Imperial War Museum
A blurry photograph of a pilot edging his Spitfire’s wing tip under a German V-1 Flying Bomb (Doodlebug, Buzz Bomb) taken at a distance from the ground, provides a dramatic and haunting image of courage. While the photo is ghost-like, we can only imagine the stark and absolute clarity of the scene from the Royal Air Force pilot’s point of view. A mindless, swastika-emblazoned malevolent weapon flying just 15 feet from his left shoulder, the crackling of the Argus pulse jet likely heard over the roar of his own Merlin, throttled up as high as he could get it to catch the primitive cruise missile. Initially, Allied pilots tried to take out the threat by shooting it down, but being a flying bomb, the results were often tragic for the attacking pilots. Many Spitfires were seriously damaged and many brave pilots were killed. Pilots had no option but to fly straight through the explosion. Later, pilots began placing their wingtips under the stub wing of the V-1, then lifting their own wing sharply. This would topple the gyros of the V-1’s guidance system and the weapon would enter into a spin, but it also often resulted in damage to the wing tips of the Spitfire. Soon, the pilots learned that all they had to do was just leave the wing tip in place under the airflow beneath the V-1’s wing and soon the disturbed air flow did the job without contact. I have high regard for the courage of these men, flying tight formation with evil. Photo: Imperial War Museum

Stirling Service. When the war was done, most of the bomber pilots of the Allies were taken off operations and began the process of demobilization. They went straight from offensive and deadly operations to home without much decompression. Some pilots however, had the opportunity to fly missions of mercy that would give them a sense that all was not horror in the world; to do something good for a change. American B-29 crews dropped supplies to Prisoners of War in Japan. Canadian Lancaster crews dropped food to starving Dutch citizens in Operation MANNA. In this photo, taken at RAF Crosby-on-Eden, Czechoslovakian orphans who lost their entire families in Nazi concentration camps and were flown to England for rehabilitation and adoption, are lifted down from a Bomber Command Short Stirling four-engined bomber. The long flight in the cold and noisy bomber does not appear to have dampened their excitement and joy. Only one, the lad at the right, seems to have the tension and mistrust one would expect still evident in his face. One wonders what happened to these three boys and girl. For the crews, this was perhaps the best way they could have ended their war—one that, in a small way, helped offset all the destruction they had wrought. Photo: Imperial War Museum